| “ | In Metroid: Samus Returns, by meeting certain conditions you can unlock a number of visuals called the Chozo Memories. These tell the story of what happened on the planet SR388, as well as what the Chozo did. They may reveal a surprising secret that nobody could have imagined. | „ |
Chozo Memories are a new feature in Metroid: Samus Returns. The eleven memories are visual artwork that shed light on the history of the Chozo that colonized SR388.[2]
Description
As stated, the eleven memories shed light on the specific faction of Chozo that inhabited planet SR388. This is similar to the Chozo Lore in Metroid Prime, which was written by the Chozo who lived on Tallon IV.
Yoshio Sakamoto revealed this feature at Gamescom 2017, and implied that the Chozo Memories would reveal what became of the Chozo. He also said that the memories are acquired by "meeting certain conditions", and they may reveal a "surprising" secret.[1] The conditions are collecting all power-ups and expansions within the game, which will gradually unlock new Memories.
In-game, the Chozo Memories are accessed via the Gallery section of the Options. Each individual memory is split into four parts which make an unlocking noise the first time they are viewed and another sound once all 4 of them are added. These 4 parts are initially monochrome, but gain color and are slightly enlarged once all of them are added. The images are unlocked by collecting the items in each area of the game. A remix of Theme of Samus (the same one as in the game's introduction) plays as the memories are viewed.
The memories depict the X Parasites, the Chozo collecting Aeion energy, and the creation of the Metroids. It is implied in one memory that the Metroids were not intended to develop beyond the larval stage.
List of Memories
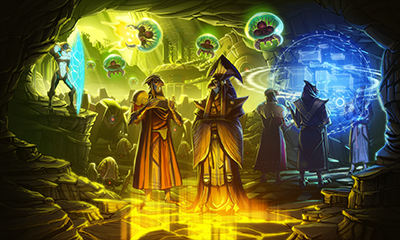
1/11
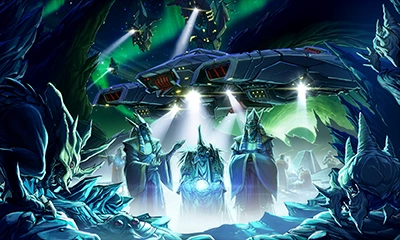
The focus of the shot are three Chozo that have landed from a starship on the surface of SR388. Behind them are four more Chozo investigating their surroundings. The main trio seem to be talking amongst each other; curiously, the two on the sides have identical attire, yet the middle figure is dressed in a less refined manner. The middle figure holds a glowing orb resembling an Item Sphere, and their overall pose resembles that of a Chozo Statue.
The foreground features four creatures watching the visitors: on the left, a Chute Leech and a Moto; on the right, two of the hard-shelled Gravitts.
Besides the starship the Chozo landed with, the sky houses three other ships. They have a different design than the main ship, favoring a vertical alignment rather than horizontal. The ever-present aurora is particularly vibrant in the night sky, and a black hole can be seen to the right, partially obscured by the Surface's rough terrain.
One last feature is the trapezoidal pyramid structure in the back-right. These structures are seen primarily throughout the Surface and Area 1, but can also be found in other areas.
2/11
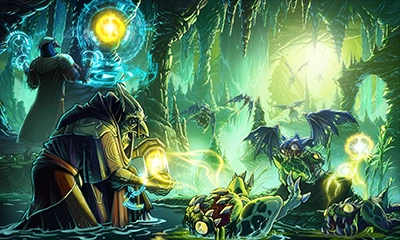
In the front there is a Chozo scientist collecting an Aeion Orb dropped by a dead Hornoad. Many Gulluggs are seen feasting on other Hornoads, some even lifting them into the air.
On the left, another Chozo scientist is investigating the Aeion Orb in a holographic structure. Similar holographs can be seen around both Chozo's arms.
Many subterranean caves with water and stalactites can be found in Area 2. This evidence suggests that Area 2 is the setting of this image.
3/11
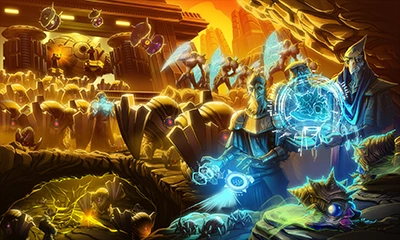
In the front right, three Chozo scientists are present, two of which are analyzing a couple Tsumuri and three unknown insects. Behind them is a large number of the Robotsmalls and Robotbigs. These robots are marching out of the large complex featured in the area, with the Diggernaut sitting at the entrance; the goliath is seeming to be inspected or worked on by two Chozo engineers. Three Halzyns can be seeing flying above the troupe.
Overseeing the marching digger bots is a squad of Chozo soldiers in battle armor with the iconic Varia Suit shoulder pads. They bear glowing blue shields, diamond-shaped and as tall as the Chozo themselves.
In the lower part of the caverns, a Chozo watches as some digger bots tear through the earth and uncover a bright yellow substance, possibly Aeion energy, illuminating the underside of the nearby rocks and walls.
The orange atmosphere in the background, as well as the presence of certain robots and wildlife, suggests that Area 3 is the setting of this image.
4/11

Three Hornoads are in varying stages of infection from the X Parasites: pre-infection, during the process, and the resulting infected variant. The caverns are flooded with the X and some have taken to attack the Chozo; a couple of parasites can be seen splatted against the soldier's shields. The X seem to glow, as seen on the surface of surrounding objects and uninfected Hornoad, but the glow intensifies when the parasite overwhelms its victim.
Blue and purple crystals are seen in the background, much like those seen in Area 4. This evidence suggests that Area 4 is the setting of this image.
5/11
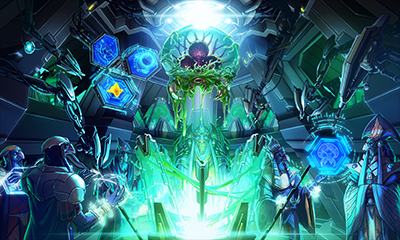
The room is a laboratory with an opened chamber in the middle that is filled with strands of a green, cohesive substance. The same substance is covering the creature that is the focus of the shot: a Metroid larva.
Surrounding the released Metroid are Chozo scientists overlooking the creature and equipment. Display monitors feature an X Parasite, a Metroid, a planet that's possibly SR388, one with indeterminable text, and a last one with an object that is difficult to identify. In the background, more larvae can be seen incubating in chambers.
The laboratory setting, including several pieces of equipment seen in the game itself, strongly suggests that Area 7 is the setting of this image.
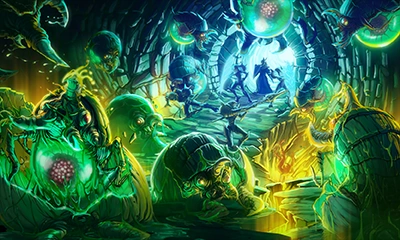
6/11

The Chozo scientists and soldiers can be seen in the background; in front of them are the chambers from the lab, opened. The Metroid larvae are flying out of said chambers and attacking the X and their mimics. There are a couple of Metroids with X inside their talons and one that is actively draining the energy from an X-infected Hornoad.
This scene takes place in a desolate canyon-like area, with large bones visible in the background. This evidence suggests that Area 6 is the setting of this image.
7/11
Two Chozo scientists stand over ground with cracks that seep yellow light. Behind them are more Chozo scientists that are observing a spherical hologram, likely of SR388. A Chozo warrior watches the Metroids that are floating above with his shield raised, one of which is attacking the sole X parasite. Robotsmalls and Robotbigs can be seen in the background and Diggernaut looms overhead.
Yellowish-green light can be seen pouring in through the cavern roof. This evidence suggests that Area 1 is the setting of this image.
8/11
Metroids have metamorphosed. The larvae have fallen to the floor and Alpha Metroids are shedding out of them. The recently molted Metroid Husks still laying on the ground are partially covered in a green substance. Once tame around their creators, the creatures have gained severe aggression and are now attacking the Chozo. Two Chozo soldiers have fallen to the creatures in this shot, one of which is in an Alpha's jaws and the other knocked off the side of a cliff with an Alpha chasing after them. One warrior wields a spear in defense while two more escort the overseers out of the area.
The yellow light is very prominent in this shot, once again coming up from the ground and illuminating the underside of objects.
9/11
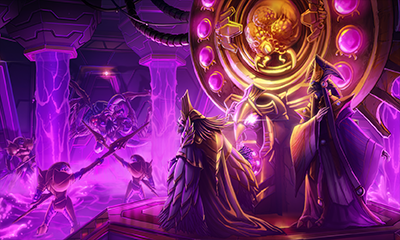
A Chozo Seal is the focus of the memory, as is the purple liquid filling the chamber. Two overseer Chozo are on the podium in front of the seal. Three warriors brandishing spears hold back the invading Gamma Metroid while the room is filled; one looks back towards the overseers.
Only one Chozo Seal with the maximum ten slots is seen in-game, in Area 3. This evidence suggests that Area 3 may be the setting of this image. However, this may also be excused by artistic license, since none of the ornate structures seen around the Chozo Seal in this memory match the environment of the Chozo Seal in Area 3.
10/11

Six Chozo overseers and scientists, the center's arms outstretched, are seen communicating with a new Chozo figure having returned to the surface. The new figure's attire is simple: an ornate headpiece, draping cloak, and a plating-covered arm. Only the Chozo's left arm is outstretched; the right one is folded up over to the left side. In the back, a battalion of Chozo soldiers can be seen at attention.
Above the crowd is a starship with the same design as the one seen in the first memory; however, this ship's thrusters are active. On the right is a large black structure with a blue glow at the top and another can be seen in the far back, behind the battalion.
11/11
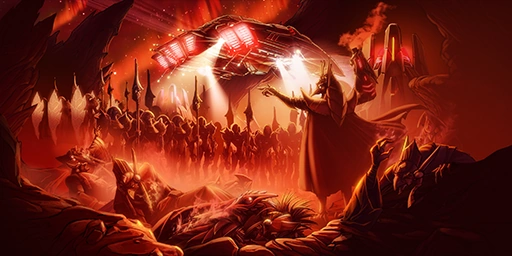
When it is unlocked, the triumphant prologue music comes to an end and a distorted screech sounds. The colors on Memory 10 are replaced by an ominous red tint and the heavy contrast distorts the image. When it refocuses, a new picture (labeled 2d/10 the first time it is viewed) appears that keeps the red and black coloration. An eerie track plays over the scene before the memory fades, but does not play when the image is viewed subsequently.
The six Chozo overseers and scientists lie on the ground, dead or dying with smoke rising from their bodies. The Chozo commander (the same individual introduced in Memory 10) is turned towards the battalion, arm outstretched while issuing an order. The Chozo's right arm bears an Arm Cannon like Samus', smoking from recently being fired. The warriors continue to stand at attention, unphased by the events before them. The motivations behind this are unknown.
Trivia
- Memory 11's implications of a malicious group of Chozo is the first to depict the bird-like race in this manner (not counting the Chozo Ghosts, as they were corrupted by Phazon to act malicious), as they have always been instead described as benevolent and good-intentioned beings throughout the games prior to Metroid: Samus Returns.
- A non-canon narrative story called Blood of the Chozo released by Nintendo Power focused on attacks by a radical group of Chozo, calling themselves the True Chozo.
- According to Sakamoto, the last Memory is implying something about the Chozo's fate, but for the time being would like to keep the fans guessing.[3]
References
- ^ a b Darren (August 24, 2017). Metroid: Samus Returns to feature "Chozo Memories". Shinesparkers.
- ^ Brian (August 24, 2017). Nintendo at GamesCom 2017 - Metroid: Samus Returns (Diggernaut, Omega Metroid, Chozo Memories). NintendoEverything.
- ^ Alonso, Álvaro (July 19, 2018). Así se hizo Metroid: Samus Returns - Entrevista a Yoshio Sakamoto - Página 1. HobbyConsolas. Retrieved on August 6, 2018.