No edit summary Tag: Source edit |
No edit summary Tag: Source edit |
||
| Line 16: | Line 16: | ||
==Description== |
==Description== |
||
| − | In both appearances, Corridor No. 3 consists of green blocks and metallic structures, including long horizontal silver tubes that can be entered in [[Morph Ball]] form. These are found in the first half of the room and are filled with [[Zoomer]]s. Only the topmost pipe leads anywhere, while the rest lead to dead ends or drop Samus into an [[acid]] pool directly below. Parts of the room in ''Metroid'' have gold-colored tiles, like that found in other rooms of Brinstar. The second half of the room has more acid pools and multiple Air Holes, as well as midair pedestals with items above the acid. |
+ | <onlyinclude>{{#ifeq:{{{1|metroid}}}|metroid|In both appearances, Corridor No. 3 consists of green blocks and metallic structures, including long horizontal silver tubes that can be entered in [[Morph Ball]] form. These are found in the first half of the room and are filled with [[Zoomer]]s. Only the topmost pipe leads anywhere, while the rest lead to dead ends or drop Samus into an [[acid]] pool directly below.}}</onlyinclude> Parts of the room in ''Metroid'' have gold-colored tiles, like that found in other rooms of Brinstar. The second half of the room has more acid pools and multiple Air Holes, as well as midair pedestals with items above the acid. |
<onlyinclude>{{#ifeq:{{{1|zeromission}}}|zeromission|With the higher graphical detail in ''Zero Mission'', the green blocks appear artificial compared to the natural blue rocks of Brinstar. "Pipes" that are present in ''Metroid'' have been replaced with steel poles, which have a red band that can be shot. Doing so causes the object to rise and allow Samus to roll underneath. There is a blockade of [[Fake Block|destructible block]]s after the steel poles.}}</onlyinclude> |
<onlyinclude>{{#ifeq:{{{1|zeromission}}}|zeromission|With the higher graphical detail in ''Zero Mission'', the green blocks appear artificial compared to the natural blue rocks of Brinstar. "Pipes" that are present in ''Metroid'' have been replaced with steel poles, which have a red band that can be shot. Doing so causes the object to rise and allow Samus to roll underneath. There is a blockade of [[Fake Block|destructible block]]s after the steel poles.}}</onlyinclude> |
||
Revision as of 05:47, 25 September 2020
Corridor No. 3[1] is a two-part room in Brinstar. It appears in Metroid and Metroid: Zero Mission.
Description
In both appearances, Corridor No. 3 consists of green blocks and metallic structures, including long horizontal silver tubes that can be entered in Morph Ball form. These are found in the first half of the room and are filled with Zoomers. Only the topmost pipe leads anywhere, while the rest lead to dead ends or drop Samus into an acid pool directly below. Parts of the room in Metroid have gold-colored tiles, like that found in other rooms of Brinstar. The second half of the room has more acid pools and multiple Air Holes, as well as midair pedestals with items above the acid.
With the higher graphical detail in Zero Mission, the green blocks appear artificial compared to the natural blue rocks of Brinstar. "Pipes" that are present in Metroid have been replaced with steel poles, which have a red band that can be shot. Doing so causes the object to rise and allow Samus to roll underneath. There is a blockade of destructible blocks after the steel poles.
The first half of Corridor No. 3 in Zero Mission is home to unidentified mushroom-like flora, which is present in the background and is apparently capable of surviving in the acid. The room now contains a hidden tunnel above the exit, with a Pit Block at the end dropping Samus in front of the door. This is used for getting around a Tangle Vine Fruit, which disappears when the Varia Suit has been obtained. In the second half, the acid pools now converge, and can be entered. Another Tangle Vine Fruit is placed in front of a tunnel in the acid.
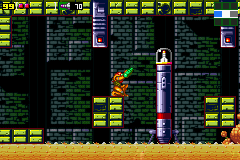
The Missile Tank in Zero Mission.
To destroy it, Samus must enter a small chamber above with a steel pole and activate it, then collect Parasites behind it and drop into the acid, exposing the Parasites to the fruit. A minimum of four are needed to have them devour the fruit. Once gone, Samus can access a tunnel leading to the second half of the room, and directly in front of a standing Chozo Statue. When used, it guides Samus to the Wave Beam's location in Norfair, and afterwards can be morphed into to replenish Samus's energy and Missile Ammo. It is also possible to reach the Chozo Statue first by ascending the end shaft of Brinstar with the Turbo Bomb, then entering this room. Samus can choose to skip the statue as well.
In Metroid, Corridor No. 3 consists of two rooms split by the corridor-connecting room. Zero Mission adds a third room, a Save Station, linking the connecting room to the Corridor's second half.
Connecting rooms
Metroid
- Gold-colored shaft (first half, via Blue Door)
- Corridor-connecting room (both halves in Metroid, first in Zero Mission; via Blue Doors)
- Save Room 3 (second half in Zero Mission; via Blue Door)
- Brinstar end shaft (second half, via Blue Door)
Inhabitants
Metroid
- 13 Wavers (11 green, 2 blue)
- 28 Zoomers (25 yellow, 3 red)
- 3 Rippers (2 yellow, 1 red)
- 4 Air Holes spawning Zebs
- 6 Reos
Zero Mission
- 4 Zoomers (first half)
- 10 Parasites (5 in each half)
- 5 Skrees (second half)
- 2 Tangle Vine Fruits
- 2 Air Holes spawning Zebs (2 in second half)
Items
- Missile Tank
- In both games, a single Missile Tank can be found resting on a structure suspended above acid, located in the final room.
- Energy Tank
- In Metroid, an Energy Tank can be found in the third room, guarded by a Reo and a pair of Zoomers. This was removed from the room in Zero Mission.
Official data
Metroid Prime: The Official Nintendo Player's Guide
- 007 PIPE PROGRESS (pg. 129)
- "When you reach the section that has four horizontal pipes, all crawling with creatures, hop up to the top pipe and roll to the right. You can destroy the enemies in the pipes by detonating Bombs, but try not to destroy any of the breakable blocks. If you fall through holes, you'll have a hard time reaching safe ground at the other end."
- 008 WALL CRAWL (pg. 129)
- "You'll reach what appears to be a dead end near the upper-right corner of Brinstar. Run up against the right wall and fire up at the ceiling to break two blocks. Jump up and move to the right, through a hidden passage. When you reach the next small enclosure, roll up and detonate Bombs as you push against the righr wall. You'll pop up and roll through a smaller passage."
Metroid: Zero Mission: The Official Nintendo Player's Guide
- 118 ON A ROLL (pg. 55)
- "When you reach Brinstar's upper area, run right, hit the red stripe on the second steel pole to make the pole rise out of the way, then roll and bomb through a blockade. Your ability to jump in Morph Ball form will be put to the test as you bounce up to the top pipe in a stack of four. Farther to the right, you'll roll through another high pipe to avoid an organic barrier."
- 125 missile tank (pg. 56)
- "Returning to the corridor that cuts through Brinstar's upper-right section, you'll find a Missile Tank on a pedestal. Collect it before you take another swim in the acid."
- 126 PARASITE DELIVERY (pg. 57)
- "An organic barrier blocks your path in the middle of the acid pool. Clear away one or two of the blocks just below the surface, then jump up, roll to the right and make your way to a group of parasites by blasting the red stripe on a rising gate. Roll on the ground to collect the parasites, then deliver them to the barrier creature. If you haven't blasted the blocks yet, be sure not to expose the parasites to a bomb blast."
Trivia
- In Victory Techniques for Metroid, Samus visits Corridor No. 3 during her initial exploration of Brinstar, collecting the Missile Tank and Energy Tank found in this location. After acquiring the High Jump Boots in Norfair, she backtracks to Corridor No. 3 to collect the Varia Suit.
Gallery
")
")
")
")
")
References