The subject of this article is not named in-game.
The current title is from a guide or other published source.
The corridor-connecting room is a room in Brinstar. It appears, with differences between versions, in Metroid and Metroid: Zero Mission. It is no longer accessible in Super Metroid.
Description[]
This is a small room between both halves of Corridor No. 3 near the top of Brinstar.
Metroid[]
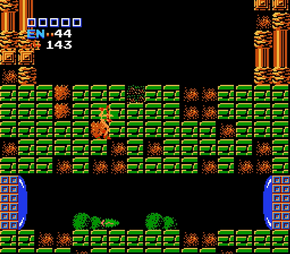
In Metroid, the initial room consists of green brick tiles and reddish rocks in the ceiling and floor, with two bushes on the ground. A pit of acid is visible below the ground, with a single Ripper patrolling above. Neither can be interacted with. A column of bricks in the ceiling are made of Fake Blocks, which can be cleared out to reveal a hidden area above. Next to the fake ceiling is a group of bricks with a lighter green color, which can be passed through on the way down. The area above features the same golden pipes, rocks and bricks as other areas of eastern Brinstar.

Samus in the ceiling, where it drops back to the floor.
To get above the ceiling, Samus can either jump up with the High Jump Boots if she has obtained them, or lure the lone Waver in the room above, freeze it with the Ice Beam, and use it as a platform.
Zero Mission[]
In Zero Mission, the room is shorter and now entirely blue. The pit of acid below is retained, but no longer features a Ripper. A second Waver is found above the ceiling as well. Once again, Samus can shoot out part of the ceiling to get to the Varia Suit, and use either the High Jump Boots, the Waver technique from the original Metroid, or the Turbo Bomb to get to the high door. An additional barricade of Fake Blocks is placed just under the door to the next room.
Connecting rooms[]
- Corridor No. 3 (via Blue Doors - both halves of the corridor in Metroid and one in Zero Mission)
- "Varia Suit corridor" (via Blue Door)
- Save Room 3 (Zero Mission, via Blue Door)
Inhabitants[]
Official data[]
Metroid: Zero Mission: The Official Nintendo Player's Guide[]
- 119 CLIMB INTO THE UNKNOWN (page 55)
- "Record your progress then return to the corridor-connecting room to the left. From there, fire into the middle of the ceiling and climb. When you get to the next room up, start on the right side, make a short run to the left and jump to the ledge."
- 15% walk-through Step 12 (page 101)
- "Jump over the flying fiend in the room that has two blue hatches. Fire through blocks in the middle of the ceiling, then climb up through the hole and let the enemy follow you. Freeze the creature and use it as a platform to help you reach the ledge on the left. From there, use bombs to propel yourself up to the blue hatch. Open the hatch and move on to the Varia Suit."
- 009 ARMOR ASCENT (page 108)
- "When you return to the room that connects halls, fire straight up to break through a series of blocks. Jump up and let the blocks re-form under your feet, then jump again. The blue hatch on the high ledge leads to the Varia Suit. Either draw the enemy from below and use it as an Ice-Beam-frozen platform to reach the hatch, or return to the area once you have the High Jump upgrade."
Nintendo of America tweet[]
"Use this handy trick to get the powerful Varia Suit upgrade early (no High Jump Boots required). Just make sure to bring at least 5 missiles to break open the item room door! Try it out for yourself with a #NintendoSwitchOnline membership. #NES"[1]
Gallery[]
")
")
")
")
References[]
- ^ Nintendo of America (NintendoAmerica). 19 Nov 2018 12:00 p.m. Tweet. https://twitter.com/NintendoAmerica/status/1064548866471706625?s=19