The subject of this article is not named in-game.
The current title is from a guide or other published source.
The blue-bubble shaft[1], also known as the purple bubble shaft[2], is a notable room in Norfair. It appears in the original Metroid and Metroid: Zero Mission, but not in Super Metroid.
Description[]
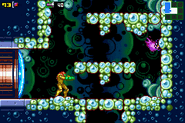
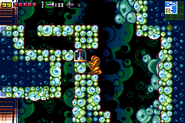
As the name implies, the blue-bubble shaft is a lengthy vertical shaft composed of bluish-purple bubble-blocks in Metroid. In Metroid: Zero Mission, the surfaces of the walls, floors, and ceilings are covered with natural green rock[3], although the blue bubble-like material is still visible beneath them.
The blue-bubble shaft is perhaps one of the most important rooms in Norfair. It runs vertically up and down the entire length of the area along its right side, thereby directly connecting all significant portions of Norfair: the Ice Beam's location in the upper-right section, the elevator to Brinstar in the middle, the various upgrades in the lower half, and the elevator to Ridley's Lair at the very bottom. Therefore, it is necessary to reach the bottom of the blue-bubble shaft in order to access Ridley's Lair.
However, the blue-bubble shaft's full size is not immediately obvious. When Samus Aran first enters the shaft, it initially appears to be a much smaller room. She must break through several ceilings and floors of the shaft's multiple chambers by using various tools at her disposal. In Metroid, she can simply use her beams and bombs. In Zero Mission, much of the process of navigating Norfair revolves around puzzles using the Speed Booster to break away Boost Block portions of the floor; this must be done by building up speed in adjacent corridors. To quickly ascend the shaft, Samus can use a well-placed Shinespark, a Morph Ball launcher, and/or the Screw Attack.
Furthermore, the blue-bubble shaft provides one of the biggest Sequence Breaking tricks in Zero Mission. The very top of the shaft, inhabited by a single Ripper and Sova (which can be frozen with the Ice Beam and used as a platform over the Pit Blocks), has a Missile Block that hides an unmapped portion of the shaft, which also runs up and down the entirety of Norfair's right side. This hidden passage completely bypasses the Boost Block puzzles and the first two Kiru Giru larvae, allowing Samus to fight the ensnared Kiru Giru and enter Ridley's Lair without the Speed Booster or Wave Beam. Another Missile Block covers the exit at the bottom of the blue-bubble shaft; to ensure that Samus has at least enough Missile Ammo to break it, a Gamet nest can be found in the shortcut.
Connecting rooms[]
- "Norfair main corridor" (via Blue Door)
- "Ice Beam access corridor" (via Blue Door)
- Norfair's upper-right path (via Blue Door)
- "Heated Missile corridor" (via Blue Door)
- "Norfair's gauntlet" (via Blue Door)
- "Hi-Jump access corridor" (via Blue Door)
- "Path of vines" (Metroid, via Blue Door)
- "Varia shrine" (Zero Mission, via Blue Door)
- "Kiru Giru larva hall" (Zero Mission, via Blue Door)
- Save Room 5 (Zero Mission, via Blue Door)
Inhabitants[]
Metroid[]
- 13 Novas
- 15 Ripper IIs
Zero Mission[]
Items[]
- Missile Tank
- In Zero Mission, after obtaining the Hi-Jump Boots, Samus must return to the blue-bubble shaft and jump over the wall immediately in front of her, then drop down behind it to obtain the tank.
- Missile Tank
- In Zero Mission, Samus must either solve the final Boost Block puzzle or use the hidden passage to drop into the final area of the blue-bubble shaft, where the tank can be found sitting in plain sight.
Official data[]
Metroid Prime: The Official Nintendo Player's Guide[]
- 016 BOMB DOWN, JUMP HIGH (p. 132)
- "After you descend into Norfair, run to the right, through a lava-filled corridor, and drop to the floor of a blue-bubble shaft. Plant Bombs on the ground to blast through to a deeper shaft."
- 017 MISSILE MANEUVERS (p. 132)
- "When you reach the top of the blue shift [sic], jump up to the ledge on the right side and fire straight up. You'll break through a line of blocks and discover an area above the ceiling."
Metroid: Zero Mission: The Official Nintendo Player's Guide[]
- 049 UP AND OVER (pg. 39)
- "The shaft on Norfair's far right side is formed from natural green rock. Climb up to the first hatch on the left and continue your journey to the next upgrade."
- 058 ADVANCED SHORTCUT (pg. 41)
- "A narrow, winding path leads through a hidden shaft on Norfair's right edge. If you're confident that you can defeat Ridley without collecting some key items, freeze the flier in the upper-right corner, hop onto it, then use a missile to blast into the shortcut. Be warned: the shortcut requires expert bomb-jumping skills."
- 113 missile tank (pg. 53)
- "You'll make use of the Hi-Jump as soon as you reach the right shaft. Leap to the tall ledge and pull yourself up to the right side of the shaft. Roll through the narrow opening and drop to a Missile Tank."
- 116 SPEEDY ASCENT (pg. 54)
- "With a new destination showing on your map, climb up then run right to the next shaft. There, you'll find a Morph Ball launcher. Use it to blast off to the shaft's upper half."
- 149 missile tank (pg. 61)
- "Starting left of the second larva's shell [in the "Kiru Giru access hall"], run to the right and open the blue hatch as you go. You'll scream into the corridor, burn through the floor and gain access to a Missile Tank."
- 193 SCREW UP (pg. 71)
- "When you reach the middle of the right shaft, use the Screw Attack to cut through several blocks in the wall to the right, then somersault up and to the left to access the upper portion of the corridor."
- 196 BUZZ THROUGH BLOCKS (pg. 72)
- "After you return to the right corridor, screw through the blocks on the ledge above the hatch and continue to climb until you reach the next hatch."
Gallery[]
References[]


