List of rooms in Metroid
|
|---|
Corridor No. 1
Corridor No. 1 is the very first room Samus Aran infiltrates in the region of Brinstar on planet Zebes. It serves as the location where her mission begins in Metroid and its remake, Metroid: Zero Mission. In Metroid and each of Corridor No. 1's appearances, to the left of the Starting Point is the first item in the game, the Morph Ball. Samus must jump over a midair rock formation somewhat resembling a staircase, and she will find the Ball on a pedestal. However, the rock formation is low enough that she cannot walk under it, and tall enough that she cannot jump back over it. Thus, the item immediately comes into use as Samus must use it to roll under the narrow space between the formation and the ground. She must then continue on to the next room, the door to which is on a raised platform. Metroid begins with Samus starting on the platform, slowly appearing on-screen.
|
Items and logbook entries |
Connecting rooms |
Fake Block shaft
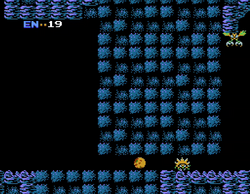
The "Fake Block shaft" is a room in Metroid and Metroid: Zero Mission. In both games, it is the second room explored by Samus in Brinstar. This room is composed of the same blue rock material as the majority of Brinstar, with noticeable stalactites on the ceiling. It initially appears to be a square room with a single "platform" in the center, partly composed of four Bomb Blocks. There is a shaft below.
|
Items and logbook entries
|
Connecting rooms
|
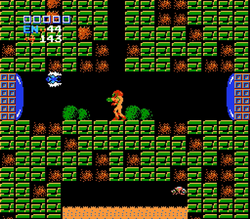
Overhang corridor
The "overhang corridor" is a room in Metroid and Metroid: Zero Mission. In both games, it is the third room explored by Samus in Brinstar. This corridor consists of rocky material with small stalactites in the ceiling, much like most of Brinstar. It begins on a plank-like ledge (in Metroid, while it is a standard ledge in the other two games), which Samus drops off of to a lower floor. The room's defining feature, hence the name, is a large rocky overhang near the center right of the room. Another defining feature is the presence of an Energy Tank in the ceiling in all three games in which this room appears. The overhang blocks Samus's way, but for a small crevice below it that she can fit through with her Morph Ball. A Zoomer may crawl under this crevice and damage her if she does not avoid it or use Bombs to kill it. The exit door is on a ledge after the overhang.
|
Items and logbook entries |
Connecting rooms
|
Blue-tinted shaft
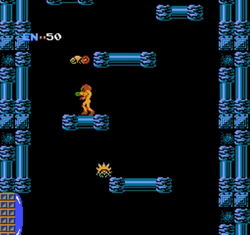
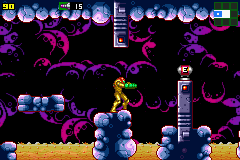
The blue-tinted shaft is a tall shaft in Brinstar. It appears in Metroid and Metroid: Zero Mission. This is the fourth room in Brinstar in the original Metroid and its remake, Zero Mission. It is a tall vertical shaft with multiple midair platforms, and serves as a hub connecting to other areas of Brinstar. For example, it leads to the room with the Long Beam, a small corridor connecting to "gold Brinstar", and the room with the Stone Statues guarding the path to Tourian.
|
Items and logbook entries
|
Connecting rooms
|
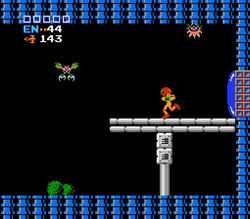
Long Beam corridor
The "Long Beam corridor" is a room in Brinstar. It appears, with differences, in Metroid and Metroid: Zero Mission. In Metroid, the room is a straightforward hallway with only two exits, including the entrance. Both doors are on raised platforms comprised of blue metal, with the rest of the room constructed out of blue pipe-like material. On the floor are four bushes, also blue. This room physically resembles the "Bomb access corridor" on the other side of Brinstar.
|
Items and logbook entries
|
Connecting rooms
|
Long Beam room
The "Long Beam room" is a small chamber in Brinstar. A Chozo Statue is found on a raised platform, holding an Item Sphere that contains the Long Beam. The room is composed of blue metal bricks and pipes.
See here for the room's equivalent in Metroid: Zero Mission.
Corridor No. 2
Corridor No. 2, also written as Corridor Number Two is a room in Brinstar. It appears in Metroid and Metroid: Zero Mission, with differences between versions. In the original game, it is a long corridor composed of the blue rock that makes up most of Brinstar, with several Koma statues, a small acid pool in the center right, and Air Holes that spawn yellow or red Zebs. At the end of the hallway is a Red Hatch which leads to the Tourian access room.
|
Items and logbook entries
|
Connecting rooms
|
Entrance to Tourian
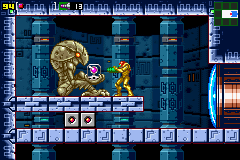
The entrance to Tourian is a room in Brinstar. It appears in Metroid and Metroid: Zero Mission, with significant differences between versions. In the original Metroid, this room is found on the top left of Brinstar, and can be accessed as soon as Samus has Missiles. It initially appears as a small chamber with two opposite-facing ledges suspended over a pool of acid. Two Stone Statues depicting Kraid and Ridley are present above the gap, displayed on pedestals. When the bosses are defeated, the pedestals can be shot, causing them to rise and a bridge of Fake Blocks to form above the acid. This allows Samus to access the elevator to Tourian.
|
Items and logbook entries
|
Connecting rooms
|
Vestibule
The "vestibule" is a short corridor connecting the blue and gold shafts of Brinstar. It is a simple corridor with a ceiling and floor constructed from two rows of small metal bricks, the tiles for which are exclusive to this room.
See here for the room's equivalent in Metroid: Zero Mission.
Gold-colored shaft

The gold-colored shaft, also known as Brinstar's left main shaft is a room in Brinstar. It appears in Metroid and Metroid: Zero Mission. In Metroid, the room is a very tall vertical shaft with a gold color scheme. It is virtually identical to the nearby blue-tinted shaft, and is also infested with multiple Zoomers and Rippers. It connects to other rooms in Brinstar, including Corridor No. 4, where Samus collects her first Missiles. At the very top of the shaft is a single platform attached to the wall, which cannot be accessed unless Samus Bomb Jumps up to it in Morph Ball. However, there is little reason to do so.
|
Items and logbook entries
|
Connecting rooms
|
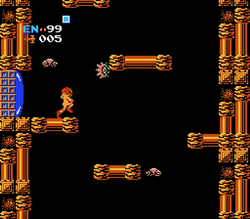
Corridor No. 5
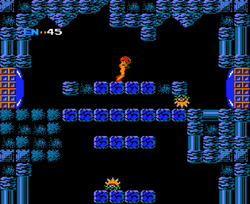
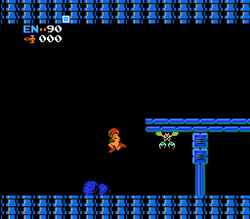
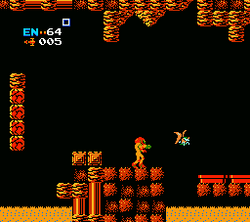
Corridor No. 5, also known as Brinstar's lower-right corridor, is a room in Brinstar. It appears in Metroid and Metroid: Zero Mission. In Metroid, Corridor No. 5 consists of gold rocky terrain, several pits of acid, and Air Holes that spawn Zebs. The Air Holes are often clustered between large blocks of rocky material, although two Air Holes are positioned above one of the pools of acid. A Missile Tank is placed on a structure suspended above an acid pit; this is expected to be the first Missile tank that Samus Aran collects in these games (and, by extension, the entire series). Corridor No. 5 ultimately leads to an elevator, which takes Samus into the fire zone of Norfair.
|
Items and logbook entries
|
Connecting rooms
|
Transport to Norfair
"Transport to Norfair" is a small room with an elevator leading to Norfair's first room. It is set in a small, square-shaped room composed of metal bricks and pipes.
See here for the room's equivalent in Metroid: Zero Mission.
Corridor No. 3
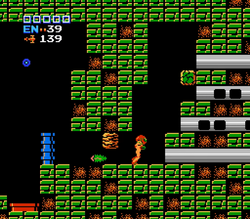
Corridor No. 3 is a two-part room in Brinstar. It appears in Metroid and Metroid: Zero Mission. In both appearances, Corridor No. 3 consists of green blocks and metallic structures, including long horizontal silver tubes that can be entered in Morph Ball form. These are found in the first half of the room and are filled with Zoomers. Only the topmost pipe leads anywhere, while the rest lead to dead ends or drop Samus into an acid pool directly below.
|
Items and logbook entries |
Connecting rooms
|
Corridor-connecting room
The corridor-connecting room is a room in Brinstar. It appears, with differences between versions, in Metroid and Metroid: Zero Mission. In Metroid, the initial room consists of green brick tiles and reddish rocks in the ceiling and floor, with two bushes on the ground. A pit of acid is visible below the ground, with a single Ripper patrolling above. Neither can be interacted with. A column of bricks in the ceiling are made of Fake Blocks, which can be cleared out to reveal a hidden area above.
|
Items and logbook entries
|
Connecting rooms
|
Varia Suit corridor
The "Varia Suit corridor" is a room in Brinstar. It appears, with significant differences between versions, in Metroid and Metroid: Zero Mission. In the original game, this room is a straightforward corridor, identical to two other corridors in Brinstar, all of which consist of blue pipes. Patches of green bushes line the floor. Both doors are positioned on metal walkways, raised above the floor by a single pillar each.
|
Items and logbook entries
|
Connecting rooms
|
Varia Suit room
The "Varia Suit room" is a small chamber in Brinstar. It is visually identical to the rooms with the Long Beam, Ice Beam and Bombs. As with these, Samus will find the namesake upgrade - the Varia Suit - in an Item Sphere in the hands of a Chozo Statue.
See here for the room's equivalent in Metroid: Zero Mission.
Brinstar end shaft
The "Brinstar end shaft" is a room in Brinstar. It appears, with some differences, in Metroid and Metroid: Zero Mission. In Metroid, the room features the gold color scheme present in other shafts of eastern Brinstar. It is infested with numerous Rippers, Wavers and Zoomers. When in this room, the highest door (to Corridor No. 3) can only be reached from the top, or by carefully freezing Rippers and Wavers and using them as platforms, due to the lack of existing platforms along that part of the shaft.
|
Items and logbook entries
|
Connecting rooms
|
Bomb access corridor

The "Bomb access corridor" is a room in Brinstar. It appears, with differences, in Metroid and Metroid: Zero Mission. This room is a long, straight corridor accessed from the rightmost shaft of Brinstar. In Metroid, it is comprised of blue pipe-like material, with several green bushes lining the ground. Both doors are found on raised metal platforms, held up by a single pedestal. Aside from a few enemies, there is little to do here besides enter the room with the Bomb upgrade.
|
Items and logbook entries
|
Connecting rooms
|
Brinstar Bomb room
The "Brinstar Bomb room" is a room in Brinstar. It appears, with some differences, in Metroid and Metroid: Zero Mission. In both of its appearances, this room houses a Chozo Statue holding the Bomb upgrade. In Metroid, the room is composed of metal bricks and pillars, and the statue is found on an upper ledge with two pillars behind it. The Bomb power-up is encased in an Item Sphere.
|
Items and logbook entries
|
Connecting rooms
|
Transport to Kraid
"Transport to Kraid" is a room in Brinstar. It appears, with differences, in Metroid and Metroid: Zero Mission. In both games, this is a small room containing an elevator and a large statue resembling a monstrous creature to the right. In Metroid, this room appears to be mostly of artificial construction, while in Zero Mission it is set in a cave. The elevator leads to Kraid's Lair, and the room can only be accessed once Samus has collected Bombs, as she needs them to destroy an obstruction in the previous room leading to this one.
|
Items and logbook entries
|
Connecting rooms
|
Corridor No. 4
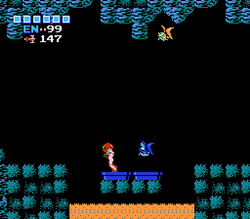
Corridor No. 4 is a series of rooms in Brinstar. It appears, with differences, in Metroid and Metroid: Zero Mission. Like much of Brinstar, Corridor No. 4 features a mixture of blue rocky territory and mechanical structures suspended over acid. It consists of three corridors and two vertical shafts. Interestingly, the blue rocks found exclusively in Corridor No. 4 in Metroid are darker and rounder than those found in the rest of Brinstar; this is also seen in the background of Corridor No. 4 in Zero Mission. In Metroid, a small section of the fifth room contains gold terrain like that seen in Corridor No. 5.
The first corridor stretches over a lake of acid, with multiple midair platforms above providing a crossing and/or a way out if Samus falls in. This room is inhabited by Wavers and Zoomers. The second room is a shaft with a fake pit of acid below the floor. Bombing the floor will drop Samus through the acid and down a shaft that is very difficult to escape from, unless she has the Ice Beam and freezes several Rippers and/or Wavers to use as platforms.
The third corridor is much the same as the first, now with a midair obstruction of Fake Blocks in the center of the room, which can be jumped over or shot through. Bombing the floor in the fourth room of will drop Samus Aran through fake acid and into another vertical shaft, leading her to another room containing the Ice Beam. Unlike the second room, this shaft is much more easily escaped due to a high number of platforms in it. The fifth and final room is a much longer corridor stretched over another lake of acid. Near the center is a ceiling composed of metal with two hanging pillars, and an Energy Tank directly underneath.In Zero Mission, the rooms are more developed and consist entirely of blue rock, with no gold, bubble or metal parts, although the hanging pillars in the fifth room remain. The third room in particular has been overhauled, now featuring Mellow hives. The Zoomers and Wavers that previously inhabited the fifth room are replaced with Skrees, and there are now walls of Fake Blocks that must be shot to proceed. If Samus has not killed the Charge Beam Beast yet, it will confront her again at the entrance to the fifth room.
|
Items and logbook entries
|
Connecting rooms
|
Cavernous hall
The "cavernous hall" is a straightforward corridor connected to the bottom of the second shaft and fourth room in Corridor No. 4. This corridor is inhabited by multiple Wavers and leads directly into the second guide chamber. Multiple caves are visible in the background.
Second guide chamber
The "second guide chamber" is entered from the cavernous hall. It is a simple room that is identical to the first guide chamber, aside from being entered from the right. There is a standing Chozo Statue in here that points Samus to the Ice Beam's location in Norfair. Afterwards, Samus can morph in the Statue's hands to replenish her energy and ammunition.
In the original Metroid, this room contained a sitting Chozo Statue with the Ice Beam, which could also be obtained in the room in Norfair. This is because beams could not stack, meaning that if Samus wanted to collect the Wave Beam, she would need to regain the Ice Beam before entering Tourian.
Transport to Tourian
"Transport to Tourian" is a small room with an elevator leading to Tourian. It is the second leftmost room in Brinstar, second only to Corridor No. 1. It is set in a natural cave with a slight green hue, although there is an artificial wall in the background. In the original Metroid, it was entirely made out of blue metal. When Samus descends the elevator to Tourian, a cutscene plays showing Metroid larvae feasting on a Zebesian corpse while a remix of the title music in Super Metroid plays.