List of rooms in Metroid
|
|---|
This is a list of rooms in Ridley's Lair in Metroid. Larger rooms have their own pages and are linked here. Many of these names are unofficial; such names will be highlighted in quotation marks.
Eerie Cave[]
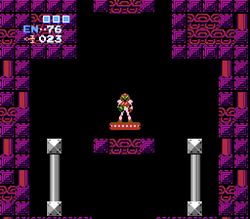
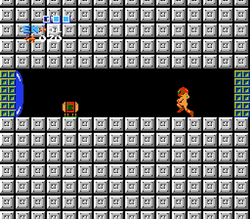
The Eerie Cave is the first room visited in Ridley's Lair in Metroid and Metroid: Zero Mission. The Eerie Cave is completely devoid of any living inhabitants. It features fuchsia and silver architecture seen commonly throughout much of Ridley's Lair. A pool of lava is present in the room, but is completely inaccessible as it is under the floor. A large block is positioned above the floor, and aids in getting up to the elevator.
|
Items
|
Connecting rooms
|
Block room[]
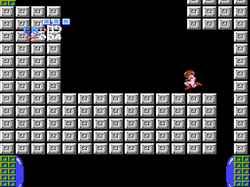
The "block room" is the first room on the left of the Eerie Cave in Ridley's Lair. It is constructed from white tiles. There is a secret tunnel in the ceiling above the entrance door, but it leads nowhere.
In Victory Techniques for Metroid, as Samus passes through this room she remarks, "Hey! This artificial passage leads into a second one..."[1]
See here for the room's equivalent in Zero Mission. It was repurposed into a Save Room in the remake.
Cocoon cavern[]
The "cocoon cavern" is a room in Ridley. It appears, with significant differences between versions, in Metroid and Metroid: Zero Mission. The cocoon cavern originally appeared in Metroid, but had a much simpler appearance. It is entirely made of white, square tiles and initially appears as a straight corridor. Firing into the ceiling on the right side (most effectively with the Wave Beam) uncovers a hidden shaft. Samus can jump up the shaft to get to a ledge above the ceiling. A door to a corridor with a Missile Tank is found here, but it can be difficult to get to without the High Jump Boots. It is devoid of any enemies, and it lacks any other purpose than to provide a path through the left of Ridley's Lair.
|
Items
|
Connecting rooms
|
Imago's hideout[]
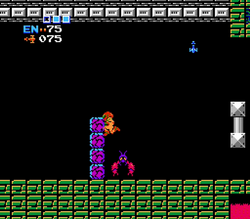
Imago's hideout is the nesting chamber of Imago in Ridley's Lair. Imago's hideout originally appeared in Metroid, but with a very different design. This room can only be entered through a secret passage in the ceiling of an adjacent room, making it entirely optional.
It is a hallway constructed primarily from purple blocks and grating, leading to a small silver chamber on the far left side where a Missile Tank can be found on a pedestal. There are two lava pools and a few small gaps in the floor to fall through into them, including a pair of invisible pitfalls in the silver chamber.
|
Items |
Connecting rooms
|
Hall of pillars[]
The "hall of pillars" is a room in Ridley. It appears, with some differences, in Metroid and Metroid: Zero Mission. In Metroid, the room has a partially metal ceiling with white tiles, but is otherwise constructed out of green bricks and pipes, as well as tiles resembling a chain in the rightmost ceiling. The room is infested with Dessgeegas and Multiviolas. There are seven of the namesake pillars, with two of them found near the front of the room. These are easy to jump over, as are a subsequent group of four pillars made of Fake Blocks.
However, the final pillar stands in front of the exit and is too tall for Samus to scale. She must lay a Bomb in certain parts of the floor and roll through the tunnel underneath. The first entrance to this tunnel is found beside a bridge over a small pool of lava near the front of the room. It is not possible to fall into the lava. The tunnel allows Samus to bypass most of the enemies, as well as the pillar, and reach the exit.
|
Items
|
Connecting rooms
|
Artificial Passage[]
The Artificial Passage is a room in Ridley's Lair/Ridley. It appears in Metroid and Metroid: Zero Mission. In the original game, the upper half of the room is constructed out of metal bricks. The Energy Tank is found in front of the left door. Directly in front of it is a gap in the floor, an illusion that can dupe Samus and cause her to fall to a much lower floor with no way back up, except to backtrack through multiple rooms. The lower area is constructed out of red and burgundy-colored bricks, with a square-shaped raised section in the middle. This is suspended over a body of lava, which cannot be reached. To obtain the Energy Tank, Samus must carefully jump over the gap.
|
Items |
Connecting rooms
|
Pronged hall[]
The "pronged hall" is a short corridor located between the upper left half of the Artificial Passage and the shaft of doom. It is composed of white and green tiles, the latter of which are interspersed with chain-like coiling tiles. This room connects the lower parts of the shafts. It is inhabited by multiple Dessgeegas.
See here for the room's equivalent in Zero Mission.
Path over lava[]
The "path over lava" is a room in Ridley's Lair/Ridley. It appears, with differences, in Metroid and Metroid: Zero Mission. In the original game, if Samus falls through the floor in the Artificial Passage, this room is one of two she can exit into, in order to continue through the lair or try to obtain the Energy Tank from the other side. It is a short corridor of green bricks and pipes, with some tiles in the ceiling and below the left door that resemble chains. In the center of the room are a group of five pillars, with two of them conjoined. The presence of multiple bouncing Multiviolas and Dessgeegas can make moving through the room difficult if Samus does not have the Screw Attack. There is a short bridge above a pool of lava, which stops right before the end, therefore leaving a small gap where Samus could fall or be knocked in if she is not careful.
|
Items
|
Connecting rooms
|
Shaft of doom[]
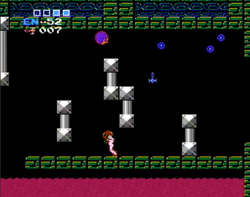
The "shaft of doom" is a room in Ridley. It appears, with differences, in Metroid and Metroid: Zero Mission. In the original game, the shaft's name comes from the fact that if Samus falls down the shaft she cannot re-ascend it. It is constructed from burgundy tiles that appear to be ornate stonework, and may represent Chozo architecture. Visiting this room is not necessary to reach Ridley, and in fact can be a source of frustration. It has three entrances at its apex, center and nadir. If entered from the first two, Samus can make use of multiple midair platforms, sixteen of which are pillars and two are single blocks. Violas are found crawling along most of these.
Should Samus fall or drop to the very bottom of the shaft, it will be impossible for her to climb back up within the room. At the base of the shaft are a pair of Dessgeegas, which hop along the floor, a short bridge and cube suspended over a pool of lava. The lava cannot be reached and is therefore not a hazard to Samus. She can continue into the Zebbo Nest from the base of the shaft.
|
Items
|
Connecting rooms
|
Zebbo Nest[]
The Zebbo Nest is a long corridor that runs through the bottom of Ridley's Lair in Metroid and Metroid: Zero Mission. The main threat of the room comes from the infestation of hostile creatures, including Holtz, Dessgeegas (Metroid), Violas (Zero Mission), and especially Zebbos. The narrow and cramped corridor is full of Air Holes that continuously spawn the Zebbos while giving Samus Aran very little room to avoid them or use the Screw Attack.
In Metroid, much of the room's layout is very similar to Imago's hideout, even appearing as an "extended" version of the latter. Sections of the Zebbo Nest feature the same repeating map tiles. This is likely one of many examples of conserving memory in the game's programming.
|
Items |
Connecting rooms
|
Ridley's rightmost shaft[]
"Ridley's rightmost shaft" is a room in Ridley's Lair/Ridley. It appears, with differences, in Metroid and Metroid: Zero Mission. In the original game, this is a very tall shaft with multiple midair platforms, constructed from burgundy bricks, chain-like tiles and pipes. The platforms are crawling with enemies and some have Air Holes that spawn Zebbos, providing an opportunity for Samus to replenish her energy and ammo. A small pit of lava is visible under the very bottom of the shaft, but is inaccessible. Small purple bushes can be seen growing in patches on the walls as well. The room's primary purpose is to connect to multiple paths in Ridley's Lair, many of which contain Missile Tanks, but only one of which leads to Ridley himself.
|
Items
|
Connecting rooms
|
Middle corridor[]
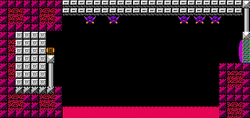
The middle corridor, also known as the middle passage is a room in Ridley's Lair/Ridley. It appears, with significant differences between versions, in Metroid and Metroid: Zero Mission. In the original Metroid, this room is divided in half by a wall. The floor is filled with lava, and the room can be crossed using multiple platforms above the lava. The right side, which is constructed from purple block tiles, is a dead end with nothing but a group of enemies, although Samus can replenish her energy and Missile Ammo using the Geegas that spawn from multiple Air Holes.
Entered from the left side with a difficult jump, the left half of the room is comprised of red and metal blocks, with teeth-like spikes lining part of the ceiling. This half is also infested with enemies, but also has a Missile Tank on a pedestal in plain sight.
|
Items |
Connecting rooms
|
Gambit shaft[]
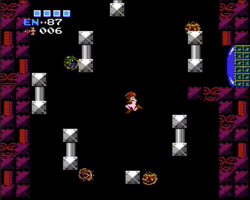
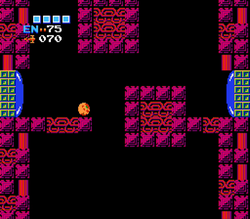
The "gambit shaft" is a room in Ridley's Lair. It appears, with differences between versions, in Metroid and Metroid: Zero Mission. In Metroid, this shaft links multiple rooms in the lower part of Ridley's Lair. It is constructed from burgundy-colored brick tiles and pipes. At its top is a large blocky overhang on the ceiling and two ledges below a door on either side. The rightmost ledge is also a large block. The two blocks' close proximity makes jumping across the gap from the left side difficult, requiring a well-timed Bomb Jump. This is to obtain a Missile Tank in the middle corridor. If Samus fails the jump, she will fall to the bottom of the shaft and have to backtrack to the top left ledge from the bottom right exit. There is little else in this shaft, aside from a raised block in the floor and an inaccessible pool of lava below. The lower left exit leads towards Ridley's room.
|
Items
|
Connecting rooms
|
Cache Access[]
"Cache Access" is a straightforward corridor, accessible from the bottom right of the Artificial Passage. It is composed of green and white tiles, with some rows having tiles that resemble chains. Lava is visible below a raised section of the floor, but it cannot be accessed. The room is packed with Dessgeegas. It leads into the gambit shaft.
See here for the room's equivalent in Zero Mission. It can no longer be accessed from the Artificial Passage in that game.
Multiviola Nest[]
The Multiviola Nest is a room in Ridley's Lair in Metroid and Metroid: Zero Mission. In Metroid, the appropriately-named Multiviola Nest is infested with Multiviolas, constantly bouncing off of surfaces for the entire length of the corridor. The close quarters often make it difficult to dodge the Multiviolas or use the Screw Attack. However, since Multiviolas often drop large amounts of Energy or Missiles when killed, this room is useful for replenishing Samus's stock.
|
Items
|
Connecting rooms
|
Ridley's room access[]
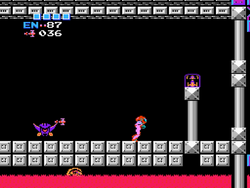
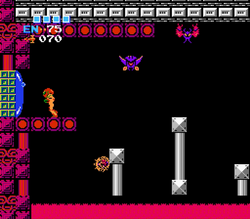
"Ridley's room access" is a corridor in Ridley's Lair and Norfair. It appears in Metroid, Metroid: Zero Mission and Super Metroid, and directly precedes the room containing Ridley himself. Each iteration has differences in design. In the original Metroid, Ridley's room access is a long corridor over lava with metallic silver pillars in midair, which Samus uses as platforms. The ceiling of the room features metal bricks, and the walls next to each door are formed from reddish blocks with circular centers. The room is infested with enemies, with a Viola on all but one pillar.
|
Items
|
Connecting rooms
|
Ridley's room[]
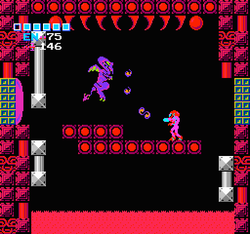
Ridley's room is the room where Ridley is battled in his lair. In the original Metroid, Ridley's room is constructed from reddish violet blocks, with a few metallic silver pillars. The ceiling of the room features silver spikes and red orbs, arranged in a manner that resembles the teeth and eyes of a large creature; a similar structure appears in Kraid's room.
The room is behind an ordinary Blue Door. Ridley resides on the raised portion of a platform in the center of the room, floating above a pool of lava. Samus Aran can choose to fight Ridley head-on, or she can jump into the lava (which actually deals less damage than the boss himself) and shoot Ridley from below with the Wave Beam.
|
Items
|
Connecting rooms
|
Ridley's reliquary[]
"Ridley's reliquary" is a room in Ridley. It appears, with significant differences between versions, in Metroid and Metroid: Zero Mission. In Metroid, Samus can access the room through a unique "Purple Blast Shield" that requires ten Missiles. Since doors do not lock in Metroid, Samus can open the door and escape into this room if necessary. The room is constructed from square, red tile and the ceiling from silver, metal tiles, which also make up part of the left wall and a pedestal holding the Energy Tank. There is no floor, which is replaced with partially fake lava. Samus can walk across the left half of it - with the right half being real lava - to reach the Energy Tank. Five Holtzes inhabit the room, and may interfere with Samus's exploration, although they are easily destroyed with the Screw Attack.
|
Items |
Connecting rooms
|
Ridley's shortcut[]
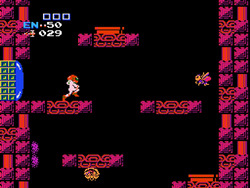
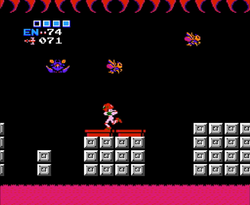
"Ridley's shortcut" is a room in Ridley. It appears, with significant differences between versions, in Metroid and Metroid: Zero Mission. This room connects directly to the entrance to Ridley, the Eerie Cave, from the right. In both games, it is a corridor-length room containing lava and multiple Holtz, Violas and Air Holes that spawn Zebbos. In Metroid, it is a straightforward corridor with the entire floor being covered in lava. The ceiling is lined with teeth-like spikes, although they are simply background fodder and do not damage Samus. To navigate the room, Samus must jump across multiple midair platforms and pillars, consisting of metal blocks.
|
Items
|
Connecting rooms
|