This article's title is conjectural.
Any name given in official media is eligible to become the title of the article.
The current title is not an official name.
The "overhang corridor" is a room in Metroid and Metroid: Zero Mission. In both games, it is the third room explored by Samus in Brinstar. It reappears in Super Metroid as one of three returning Brinstar rooms from the original game, the other two being Corridor No. 1 and the "Fake Block shaft".
Description[]
This corridor consists of rocky material with small stalactites in the ceiling, much like most of Brinstar. It begins on a plank-like ledge (in Metroid, while it is a standard ledge in the other two games), which Samus drops off of to a lower floor. The room's defining feature, hence the name, is a large rocky overhang near the center right of the room. Another defining feature is the presence of an Energy Tank in the ceiling in all three games in which this room appears. The overhang blocks Samus's way, but for a small crevice below it that she can fit through with her Morph Ball. A Zoomer may crawl under this crevice and damage her if she does not avoid it or use Bombs to kill it. The exit door is on a ledge after the overhang.
In Zero Mission, the corridor is shorter to account for the Game Boy Advance's reduced screen size. The entrance ledge and the ceiling above it are now made of architecture, although the rest of the room is still natural. There are three purple boulders in the background, and the room has fewer enemies. The overhang is now more rugged in appearance, with a hole in its center. A standing Chozo Statue is found on the other side of the overhang. Using it will create a waypoint on the map leading Samus to the Long Beam's room. After this, the Chozo Statue sits down and can be used on return visits to recharge Samus's energy and ammunition.
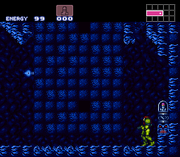
In Super Metroid, the room has become desolate since the Zero Mission, and does not need to be entered to advance the mission. It retains its general appearance from Metroid, but with a darker blue hue, and it adds three Koma heads to the room: one in the ceiling and on the entrance ledge, and then one behind the overhang. The shaft that connected to the rest of Brinstar from here is no longer accessible and has been replaced by a solid wall. A Missile Tank can now be found here, as well as a second Eye scanner (after that found in Corridor No. 1) in front of the overhang.
If Samus returns to the room after she is attacked by Space Pirates, it will now be populated by Skrees and Zoomers. Using a Power Bomb will destroy two rows of tiles on the overhang and expose a shaft, which Samus can ascend with a well-timed Shinespark to reach a previously inaccessible corridor.
Connecting rooms[]
- "Fake Block shaft" (via Blue Door)
- Blue-tinted shaft (via Blue Door in Metroid and Zero Mission)
In Super Metroid, a hidden shaft in the overhang now leads to an upper corridor with falling boulders and an invisible bridge.
Inhabitants[]
Metroid[]
Metroid: Zero Mission[]
- 3 green Skrees (Normal Mode)
- 5 blue Skrees (Hard Mode)
Super Metroid[]
Items[]

- Energy Tank
- In all three games, this is found in the ceiling near the rocky overhang. It can be reached in several ways, including with the High Jump Boots, Turbo Bombing, a Wall Jump, "damage boosting" off of a Reo, or the Space Jump.
- Missile Tank
- Super Metroid only, behind the rocky overhang.
Official data[]
The Official Nintendo Player's Guide[]
- POINT 14 (pg. 59)
- "There are six visible energy tanks, and two other hidden ones. Point 14 is one of them. Obtain it by freezing an enemy and jumping on him."
Nintendo Power[]
- HIDDEN ENERGY (Volume 29, pg. 40)
- "Samus must use bombs or lasers to reveal the hidden tunnels and items. To reach the energy tank in the ceiling near the starting room, shoot it, freeze a Spiny or Skree about half way to the tank, jump onto the frozen creature and then jump to the energy tank."
- Energy Unveiled (Volume 60, pg. 13)
- "Samus will remember from her first adventure on Zebes that there is an Energy Tank in the ceiling here. She'll need Hi-Jump Boots to get it."
Super Metroid Nintendo Player's Guide[]
- HIDDEN ENERGY TANK (pg. 45)
- "Like it was in the original Metroid game, an Energy Tank is hidden in the ceiling. When you have the Hi-Jump Boots, come back and get it. You can Turbo Bomb up to it, too!"
- "Use a Power Bomb to clear away the bricks and then go up."
Super Metroid Players' Guide[]
- POWER BOMB-ON! (pg. 27)
- "Detonate a power bomb under these blocks to clear a vertical passage. You need the hi-jump boots to get up quickly, although turbo-bombing is possible. It's not really worth the effort, though, as it's very hit and miss and will take ages."
Metroid: Zero Mission: The Official Nintendo Player's Guide[]
- 003 RUN THEN ROLL (pg. 28)
- "Batlike beasts hang from the ceiling and drop as you pass them. Run past the enemies or blast them from below when they're within range. As you approach the rock formation, shrink into Morph Ball form then roll through the narrow passage."
- 004 TOO EARLY FOR EXTRA ENERGY (pg. 28)
- "On the map screen, you'll notice a circle-shaped mark in the first horizontal passage - it indicates the location of an unclaimed item. It's an Energy Tank in the ceiling. On your first run through the area, you won't be equipped to collect the tank, but take note of its location for later."
- 005 chozo statue (pg. 28)
- "The ancient Chozo civilization left clues and item upgrades for the worthy warrior. You'll find help in the planet's Chozo Statues.
- When you reach a standing Chozo Statue, you'll notice that its hands are glowing with energy. Jump into the light and form a Morph Ball. The statue will reveal the location of the next major Power Suit Upgrade - the Long Beam - on your map screen.
- After you've examined the map and pressed the A Button to return to the action, the statue will sit down, revealing a passage behind it, and it will refill your energy reserve. Once you have expendable weapons, Chozo Statues will also replenish your weapon supply."
- 066 energy tank (pg. 43)
- "On your way to the lower-left section of Brinstar, you'll obtain the Energy Tank that was out of reach at the beginning of the adventure. Shoot at the ceiling to expose the tank, then roll into Morph Ball form and press B repeatedly to reach the tank by way of bomb blasts."
Gallery[]
")
")
")
")
")
")
")
")
")
")