m (Minor grammatical fixes) |
|||
| (3 intermediate revisions by 2 users not shown) | |||
| Line 1: | Line 1: | ||
{{Conjectural}} |
{{Conjectural}} |
||
{{Infobox Room |
{{Infobox Room |
||
| − | |name |
+ | |name = Sidehopper hall |
| − | |image |
+ | |image = [[File:Sidehopper hall.png]] |
| − | |caption |
+ | |caption = Samus in the center of the room. |
| − | |game |
+ | |game = ''[[Metroid: Other M]]'' |
| − | |planet/ship |
+ | |planet/ship = [[BOTTLE SHIP]] |
| − | |area |
+ | |area = [[Main Sector]] |
|notable features = Railings, locking door, [[Desbrachian gate]] |
|notable features = Railings, locking door, [[Desbrachian gate]] |
||
| − | |significance |
+ | |significance = Access to [[Main Elevator (Main Sector)|Main Elevator]], enemy encounter, [[Overblast]] tutorial, leads to [[Control Bridge]] |
| − | |enemies/wildlife = [[ |
+ | |enemies/wildlife = [[Bull]]s, [[Sidehopper]]s, [[Desbrachian]] |
}} |
}} |
||
| Line 15: | Line 15: | ||
==Description== |
==Description== |
||
| − | This is a straight walkway that connects the rest of the Main Sector to the [[Main Elevator (Main Sector)|Main Elevator]] that leads to [[Biosphere|Sectors 1]], [[Cryosphere|2]] and [[Pyrosphere|3]]. It has very simple architecture: several forward-facing buttresses lining the walls, a railing in front of them with blue lights in between each buttress, blue fluorescent lights on the ceiling, and a black-colored floor. Notably, several sections of it on either side are transparent |
+ | This is a straight walkway that connects the rest of the Main Sector to the [[Main Elevator (Main Sector)|Main Elevator]] that leads to [[Biosphere|Sectors 1]], [[Cryosphere|2]], and [[Pyrosphere|3]]. It has very simple architecture: several forward-facing buttresses lining the walls, a railing in front of them with blue lights in between each buttress, blue fluorescent lights on the ceiling, and a black-colored floor. Notably, several sections of it on either side are transparent and covered with panes of [[glass]] that have a hexagonal pattern across them. |
In the center of the room, the railing on the right curves into the wall and stops beside a [[Desbrachian gate]], which cannot be opened on the first visit as [[Samus]] is not [[authorized]] to use her [[Power Bomb]]s. |
In the center of the room, the railing on the right curves into the wall and stops beside a [[Desbrachian gate]], which cannot be opened on the first visit as [[Samus]] is not [[authorized]] to use her [[Power Bomb]]s. |
||
| Line 25: | Line 25: | ||
==Connecting rooms== |
==Connecting rooms== |
||
| + | *"[[Tall elevator shaft]]" (via automatic door) |
||
| − | *[[Main Elevator (Main Sector)|Main Elevator]] |
+ | *[[Main Elevator (Main Sector)|Main Elevator]] (via automatic door) |
| − | |||
| + | *"[[List of rooms in Metroid: Other M/Main Sector#Control Bridge lift access|Control Bridge lift access]]" (via [[Desbrachian gate]]) |
||
| − | The room is entered from a massive shaft with a long [[elevator]] that connects between multiple levels of the [[Main Sector]]. Through the Desbrachian gate, it exits into a corridor leading to the [[Control Bridge]] elevator. |
||
==Inhabitants== |
==Inhabitants== |
||
| Line 36: | Line 36: | ||
==Official data== |
==Official data== |
||
===''[[Metroid: Other M Premiere Edition]]''=== |
===''[[Metroid: Other M Premiere Edition]]''=== |
||
| + | ;Page 51 |
||
| − | + | :''"After exiting the room with the elevator, you’ll be trapped inside a long corridor with Reos and several Side Hoppers. Use Overblast to eliminate all the Side Hoppers and the door on the opposite end of the corridor will unlock. Enter the Main Elevator room at the far end of the corridor to access Sector 1."'' |
|
:'''Note:''' ''"There is another circular hatch in this long corridor that you cannot access just yet. Make a note of it, but don’t worry about it for now."'' |
:'''Note:''' ''"There is another circular hatch in this long corridor that you cannot access just yet. Make a note of it, but don’t worry about it for now."'' |
||
| + | ;Page 141 |
||
| − | + | :''"Leave the Main Elevator room and explore the halls leading back toward the [[Spaceport|docking bay]]. Find the dormant Desbrachian on the right and wake it with a Power Bomb. Defeat it quickly, then proceed through the hatch on the right."'' |
|
==Gallery== |
==Gallery== |
||
Revision as of 05:19, 30 May 2020
This article's title is conjectural.
Any name given in official media is eligible to become the title of the article.
The current title is not an official name.
The "Sidehopper hall" is a room in the Main Sector. It appears in Metroid: Other M.
Description
This is a straight walkway that connects the rest of the Main Sector to the Main Elevator that leads to Sectors 1, 2, and 3. It has very simple architecture: several forward-facing buttresses lining the walls, a railing in front of them with blue lights in between each buttress, blue fluorescent lights on the ceiling, and a black-colored floor. Notably, several sections of it on either side are transparent and covered with panes of glass that have a hexagonal pattern across them.
In the center of the room, the railing on the right curves into the wall and stops beside a Desbrachian gate, which cannot be opened on the first visit as Samus is not authorized to use her Power Bombs.

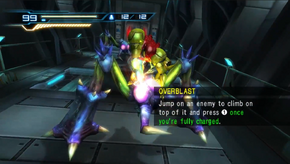
Samus Overblasts a Sidehopper.
When Samus enters the room for the first time, the door to the Main Elevator is locked and there are two Bulls in the room. As she moves closer, two Sidehoppers appear out of nowhere (as there is nothing in the room for the Sidehoppers to emerge from). Although an on-screen tutorial for the Overblast is given in the slender walkway previously, it appears on-screen again here as the game encourages Samus to dispatch the Sidehoppers with Overblasts. Once they are defeated, three more Sidehoppers spawn approximately six seconds later and Samus is required to kill them as well. Once they are dead, Samus can enter the Main Elevator room.
On her return to the BOTTLE SHIP during the post-credits sequence, Samus can continue her journey to Adam's helmet through this room. Once she returns from the Cryosphere via the Main Elevator (or another sector if she has decided to collect expansions), she can use a Power Bomb in this room to summon the Desbrachian and destroy it. Through the gate, she will find a corridor leading to an elevator to the Control Bridge, where she encounters Phantoon for a second time. If the save file is reloaded after completing the post-credits quest, the Desbrachian will remain dead.
Connecting rooms
- "Tall elevator shaft" (via automatic door)
- Main Elevator (via automatic door)
- "Control Bridge lift access" (via Desbrachian gate)
Inhabitants
- 2 Bulls (first visit)
- 5 Sidehoppers (first visit)
- 1 Desbrachian
Official data
Metroid: Other M Premiere Edition
- Page 51
- "After exiting the room with the elevator, you’ll be trapped inside a long corridor with Reos and several Side Hoppers. Use Overblast to eliminate all the Side Hoppers and the door on the opposite end of the corridor will unlock. Enter the Main Elevator room at the far end of the corridor to access Sector 1."
- Note: "There is another circular hatch in this long corridor that you cannot access just yet. Make a note of it, but don’t worry about it for now."
- Page 141
- "Leave the Main Elevator room and explore the halls leading back toward the docking bay. Find the dormant Desbrachian on the right and wake it with a Power Bomb. Defeat it quickly, then proceed through the hatch on the right."
Gallery
")
")
")
")
")